Pages

Showing posts with label Amateur alert. Show all posts

Friday, August 2, 2013

Seven Quick Takes


1. Might I be the least consistent blogger on the planet? Perhaps. Onward!

2. Grace requested a mascara recommendation, so I told her about my new favorite mascara (there is one every quarter or so, so don't get too excited until at least three months have elapsed and I'm still using it), Revlon Lash Potion. I like big lashes (not spidery, but emphatic, let's say), and this one delivers for me. It also stayed on through a pool session with my crazy water babies without running and -- get this-- it's not waterproof. Amazing! It also supposedly makes lashes healthier? Which I can't really speak to at this point, but sounds good.

3. Yesterday was crazy. We ran a million errands in the morning and I started dinner early (miracle!) because we teach the baptism class at our parish once every other month and last night was the night.  I put up the baby gate to keep the kids in the dining/play area so I could see them (is this good parenting? Shouldn't they obey obediently when I ask them to stay where mommy can see them for the 12th time?) while I cooked dinner, but! The gate was around corner down the hall about three feet, and in that nefarious, unseen three feet of hallway, Juliana managed to get a hold of a Costco-sized bottle of hand lotion and pump it all over Samuel's head. I'm going to guess at least 15 pumps of extra-rich moisturizing hand lotion. When I found him she had styled it into very fashionable spikes while he sat happily enjoying all the attention.

4. Oh, and this was her outfit yesterday. She doesn't like to wear clothes during and after naps (in the morning it's fine; we don't run into a problem until naptime when she strips herself naked every day). Sometimes we make compromises to get her into clothes. Any clothes:
Princess dress: check.

Crown and apron: check.


All taken within 10 seconds of each other.

Vamping while cooking.

5. We got a little vacation in before the madness of the school year descends, and it was wonderful. We spent two mornings at the zoo and two afternoons in the hotel pool. Both kids were in absolute heaven. I even managed to get one whole picture of the kids and me.
Sammy gets his deadpan from his daddy. 
6. In case anyone is keeping score, I'm still totally addicted to these (Costco size, obvs.). As far as I can tell, they're health food. Antioxidants, right?

7. Is anyone watching Project Runway anymore, or is it just me and Tom and Lorenzo (lots of salty language at that link!)? This Timothy kid, am I right? This week got gnarly and I'm not sure who came off looking worse: Tiny Tim, his crazy mean partner, or the Russian guy. I think probably the Russian guy. 

Go see Jen for lots more takes!

Tuesday, June 4, 2013

Secret Recipe Chocolate Chip Cookies

A quick perusal of my Pinterest boards would reveal a few things: first, I recently chopped all my hair off (I obsessively pinned hair pictures for weeks beforehand). Second, I am a sucker for a good DIY idea (as who is not?) and third, I can never have too many chocolate chip cookie recipes.  I am fairly confident in saying that, if forced to only have one dessert forever, that dessert would be some sort of chocolate chip cookie.  It's a love story for the ages. 

My favorite sort of cookie is extremely chewy, a little crisp, has sea salt and no nuts (I will post my favorite recipe for that at some point-- it's my excessive modification of these). I could live on them for days. My poor husband, though, prefers crunchy cookies with nuts and lots of other ingredients (sacrilege!), so I like to find recipes for him too. Just the other night I was going through my mom's giant recipe box and I found a "Secret Recipe Chocolate Chip Cookies" recipe. It had some unusual ingredients (lemon juice, ground oatmeal) so I thought I'd give it a try.  Verdict: excellent.  They're flavorful and soft and unique.  The cinnamon doesn't make them taste like oatmeal cookies, it just gives them a depth and (apparently) the lemon juice helps to activate the baking soda? Sure!  Here's the recipe:

Not a great photo, but the idea is there...


Secret Recipe Chocolate Chip Cookies

1/2 Cup Rolled Oats
2 1/4 Cups all-purpose flour
1 1/2 teaspoons baking soda
1/2 teaspoon salt
1/4 teaspoon cinnamon
1 cup (2 sticks) softened butter
1 cup firmly packed brown sugar
1/2 cup granulated sugar
2 teaspoons vanilla extract
1 teaspoon lemon juice
2 eggs
2 cups semisweet chocolate chips
1 cup chopped walnuts

Preheat oven to 350F. Place rolled oats in food processor or  blender (I used our Magic Bullet) until finely ground. Combine ground oats, flour, baking soda, salt and cinnamon in a mixing bowl. 

In a mixer, cream butter, sugars, vanilla and lemon juice together. Add eggs and beat until fluffy.

Stir in the flour mixture and add chocolate chips and nuts. Drop a couple inches apart on a cookie sheet and bake 10-12 minutes or until lightly golden and set in the middle. 

Thursday, November 8, 2012

Mini Bedroom Makeover

Recently (er, the last five months or so.  I'm slow.) I've been re-doing our master bedroom.  First we got a new (old-- antique) dresser, then we rearranged the furniture.  After that I decided to paint the wall behind the bed a navy blue.   We've never had a headboard, so it was a pretty big, pretty blank dark blue wall.

Wall 1
Forgive the bad cell phone photography.

The creative impulses that led me to paint the wall navy (all the other walls in my house are beige.  This was a big deal.) dried up at that point and it took me until this week to decide what I wanted to do.

Since every other available frame/canvas/bare space in my house is covered with pictures of the kids, I wanted to make the bedroom more of a kid-free zone.  I bought some incredibly cheap frames from WalMart and spray painted them white and painted the mats black and framed up some wedding photos .

The frames as-purchased:


Frame Before
I want to say this cost $3.99 at WalMart? Nothing some spray paint can't fix!

I also wanted a quote for the wall, but wanted something custom and didn't feel like paying for a custom decal.

I poked around Pinterest for some how-to advice and cobbled together my solution.  I found a font and a quote I liked ("I have found the one whom my soul loves" from Song of Solomon and Miss Le Gatees font) printed it on several pieces of paper in size 400 font, and rubbed chalk on the back of each page and then taped them up on the wall and traced the letters (with a de-leaded mechanical pencil) to transfer the "stencil" to the wall.

Stencil
It really looks magical at this point.
Stencil 2
Getting there...

and (a few hours later) that was that.  The finished result:


After 3


And a wider view:

Bedroom After

Ta da!

I was going for pretty and peaceful.  We're getting there.

Linking up with Leila today for some Master bedroom fun (... not that kind of fun)! I have her to thank for getting this project moving (she said to spruce up the master, so I did!). 

round button chicken

Wednesday, November 2, 2011

Halloween 2011, Pinterest-Style


Since Monday was my Jellybean's first "real" Halloween (the first one in which I was no longer recovering from childbirth, that is), I felt compelled to make her a costume.  Now, I don't sew.  At all.  It's kind of sad.  I wish I did sew, though!  I have TONS of pins on Pinterest with sewing projects just sitting there, taunting me with their cuteness.  So I had to find something that was very light on the sewing, otherwise my "making" the costume would have consisted of me asking my mom to make it for me.

In my search I found so many incredibly cute ideas:


via Pinterest
I thought this was beyond darling, but would require all kinds of sewing machine time.  Not to mention skill.

Then there was this:

via Pinterest
Oh my gosh I almost died at the cuteness. Plus it links through to a real tutorial.  Alas, though, it not only required sewing skills but some sort of plasticized belt action that was way out of my skill set.

And this is clearly awesome, but there's no way my kid is going to be willing to sit in a bucket all night.  Too big:

via Pinterest (Seriously if you're not on Pinterest I don't even know where you get your ideas.  You are awesome.)

But this.  When I saw this I knew:
Via Pinterest via Ashley Ann Photography

It has all the qualifications: 1) It's ADORABLE 2) It's completely awesome 3) It's very, very light on the sewing. Plus it has the added bonus of being a superhero costume, which meant the hubs was TOTALLY on board.

I wasn't sure how I was going to pull off the shirt, as hers was a retro printed one from Old Navy, but I figured maybe an iron on or something would do it.  

So I set out, an intrepid explorer on my lunch break and braved the Walmarts.  There I found the perfect shade of tulle, the white felt and the red felt (for the stars on the cuffs and crown) and, randomly, the last 12 month plain red t-shirt in the store.  I didn't find any suitable gold fabric, though, so that had to wait for a trip to JoAnn's.  

(I took no pictures of the progress, sadly)
The tutu was no problem.  I watched this tutorial and that was it.  Two hours one evening and done. It took me a little longer to sew in the white stars, but I just did that little by little.  I then decided on puffy painting the logo onto her t-shirt and then added lots of gold glitter, which worked great. 

The last hurdle was the actual sewing.  I ended up running down to the last minute and had to figure out how to hand sew the thing at work on my lunchbreak.  So keep that in mind!  It came out fairly well, but not exactly like the inspiration.  And the cuffs had to be sacrificed.  Just no time at all.  Oh well, she looked cute anyway!  Behold, the finished product, with some leggings added for warmth:

Aren't I cute, flying in my invisible plane?

The pink diaper sticking out really adds the effect.
She had a great time and looked adorable... all we could ask for really!  Happy November everyone!

To see tons of other actualized Pinterest ideas, check out Young House Love today!

Saturday, September 24, 2011

Quasi-review: Pride and Prejudice at South Coast Repertory

Tuesday night my mom and I headed down to South Coast Repertory in Costa Mesa and saw a play I've been looking forward to seeing for ages: Pride and Prejudice.  I am calling this a "quasi-review" because, let's be honest, I have very, very little objectivity when it comes to Jane Austen.  I love her.  I also love anything that falls into the British-period-romantic category.  I cannot help myself.

With that in mind, let's begin.

The show is a period-correct, faithful adaptation of the book with one caveat: there is a brief "contemporary" opening in which a teenage girl is given a copy of the novel and then takes part in the action of the play as an observer and a reactor.  This, to me, was the single most distracting aspect of the entire play.  At one point she jumped into the carriage with Elizabeth and the Gardiners as they were heading to Pemberley.  Ack.  The actress playing the role, Claire Kaplan, brought as much as she could to it, but ultimately it was just incredibly annoying.

Here you can see how incongruous the "observer" character looked onstage.  Eek.
I enjoyed pretty much everything else about the play, though: the acting was good; great in some cases.  Mrs. Bennet, played by stage veteran Jane Carr, was perfect in the part, as was Randy Oglesby as Mr. Bennet and most of the other principle actors.  Mr. Collins was an absolute highlight as well.  Scott Drummond was perfectly awful as the socially awkward vicar and clearly delighted in every bit of it.

To me, the best part of seeing Pride and Prejudice live was the energy of the audience.  On a Tuesday night the show was just packed with Austen die-hards (as evidenced by some particularly nerdy bathroom-line conversation: "I agree that the '95 is vastly preferable to the '05 but have you seen the Olivier??  Oh you must, you must!"), and everyone in the room was clearly waiting for their favorite lines and scenes.  As each favorite was delivered ("An unhappy alternative is before you, Elizabeth...") the room tensed with anticipation and howled with laughter.  It was truly an Austen geek-fest, and that is what made it such fun.

Pride and Prejudice is onstage at South Coast Repertory through October 9th.

Monday, April 18, 2011

No-Waiting Cinnamon Rolls

In my Quick Takes on Friday I noted that I had found a recipe for no proofing, no rising cinnamon rolls that I wanted to try.  Lo and behold, on Saturday morning my little bean woke up early giving me the perfect excuse to make them for breakfast.

Since I hadn't planned on making them beforehand I didn't shop for any ingredients or anything which is why when I pulled up the recipe, I realized there were some problems.  1) It called for ricotta cheese, of which I had none and 2) it called for a food processor which I also did not have.   The author mentioned she preferred this recipe to another she had tried that hadn't worked for her, so I clicked on through to that site.  There I discovered that there was no ricotta/food processor requirement, so I went for it.   This is how it went.

Your players:

Pretty basic stuff.


The first thing you do is mix together the brown sugar, cinnamon, and melted butter until it resembles wet sand.


Next you whisk together the dry ingredients in a separate, larger bowl: flour, sugar, baking powder,  baking soda, and salt.


Check on your sous chef.


Looks like a party over there.  Moving on.


In another bowl (medium sized) whisk the buttermilk and melted butter together, then add to the dry ingredients.


Mix together thoroughly with a wooden spoon.  Note that right now my mixer looks like this:


and that pleases me.  No mixer dishes!   I don't know why, but washing the mixer bowl and attachments always seems so daunting.


Anyway, once you mix the dough, it will be pretty soft, and look like this:


Turn that out onto a floured surface and knead for 1-2 minutes, until it looks like this:


The light wasn't great... early morning.


Shape the dough into a 12x9" rectangle and pour the remaining two tablespoons of butter over the top, spreading it evenly.


Pour the filling over the top, spreading it out evenly and leaving about an inch border on all sides.


Roll the back edge towards you, keeping a tight roll by moving back and forth at an even pace.  Bring the front up to the top, pinching the edges to seal.


Cut the roll into 8-12 equal pieces, depending on how large you like your cinnamon rolls (I did more like 12).  Place them in a greased cake pan.  Here is a picture of them in the oven, as I forgot to take one on the counter.


They took about 25 minutes to bake and I made the glaze in the meantime.


I have no pictures, but I whisked together 2 oz. mascarpone cheese, 1/2 cup powdered sugar, and 2 teaspoons of vanilla.  I liked the sweet glaze, but I think I'd prefer the tang cream cheese has to the milder flavor of the mascarpone for next time.


Once the rolls come out of the oven, pour the glaze over and let everything get all warm and cozy.  Here is the finished product.


Final verdict: the texture was a little different than normal rolls; a little denser and flakier, but they were good and took about as long to make as some cookies, which is a major bonus in my book.  Try them out on a Saturday morning when you're up before everyone else with the baby.  People love yummy surprises.


No-Yeast Cinnamon Rolls


Recipe by Cooks Illustrated via Gastronomy Blog.  Click the link to get the full recipe!


Friday, April 8, 2011

Living Room Mini Makeover

Calling this a "makeover" is definitely an overstatement, but oh well.

Today we got our new custom DVD case from a friend of ours who does woodworking (so gorgeous!) so we changed out our cabinets and moved some things around.

Here is the new cabinet (on the right) and the old bookshelf (left).

Definitely needed to go.


Unfortunately we didn't have a replacement in mind, but after wandering around my house for a while I remembered my sweet robins-egg blue/green antique table that was awkwardly hanging out in my kitchen holding cookbooks.  And what better to hold cookbooks than a stray bookcase?  I tell you.


Here is the table in its new spot:


I don't have a picture of it, but I assure you the bookcase is now happily fulfilling its calling holding all my cookbooks in the kitchen.


One more view:


Is it really important for you to know why Scoobi Doo is on the TV?  Let's blame my husband and leave it at that.


I like it!  I wasn't sure at first as it's much smaller than what was there before, but I love the table, so it's growing on me.  Plus, I put my ceramic bird on it in the meantime, and bird statues make everything better!

Wednesday, April 6, 2011

Chicken "Carbonara," or, How to Make Do With What is in the Pantry

The other night I went to make dinner and I was missing several key ingredients.  I didn't have cream to make a creamy sauce, I didn't have tomato sauce to make a red sauce, and I couldn't figure out what to make with my thawed chicken thighs.  I visited Pioneer Woman for some ideas, and decided to try an extremely modified carbonara.  Using this as a starting point, I gathered together these guys:

Not shown: two eggs,  olive oil, spaghetti (or whatever long noodle pasta you like), and a couple of tablespoons of butter


First, season the chicken with salt and pepper.


Put the chicken into a deep skillet skin side down.  Let it brown really well and then flip to the other side.  Check out my new splatter shield!  Favorite kitchen gadget.  I am freakishly afraid of being splattered on.


While the chicken is cooking, dice up your onion and mince your garlic (or cheat, like me, and use the stuff in the jar).  Also, grate your parmesan cheese.  You'll need about 3/4 of a cup. Once the chicken is done, transfer it to a plate and drain all but a tablespoon or two of the fat from the pan.


Saute the diced onion in the chicken fat and after a minute or two add the garlic as well.  Saute until translucent.


Thus endeth almost all of my useful pictures.


Go ahead and get your pasta going at this point.  I used spaghetti, cooked to the instructions on the box.

With a slotted spoon, remove the onion and garlic from the pan and add in your mushrooms.  Brown them up nicely and remove them from the pan as well.

Deglaze the pan with about a cup of wine and let it reduce til it's almost gone, then add in a cup of stock (note: I think chicken stock would be preferable, but I was working out of the pantry and we didn't have any).  At this point, add your garlic, onions and mushrooms back in and let simmer.

Now here's where things get weird.  In a separate, large bowl (big enough to fit everything including your pasta) beat together your cheese and your two eggs.  As soon as your pasta is finished, drain it and dump it, piping hot, on top of the egg/cheese mixture.  Immediately add the onion/mushroom/stock sauce to the top to the bowl along with about 3 tablespoons of butter.  With tongs, briskly toss everything together for a few minutes until it all comes together and looks nice and creamy.


Top with pine nuts, more parmesan and some pepper and next to your crispy chicken and I promise, as bad as that last picture is, it was quite good!


And yes, it would have been nice to have a finished product photo here.  No, I don't have one.  I think my camera died before I had a plate ready.  At least, that is the most likely explanation.


Monday, March 14, 2011

Buckwheat Pancakes


Okay listen. I'm perhaps the least qualified person on the planet to start doing cooking tutorials, but I was making buckwheat pancakes for the hubs yesterday morning, and I thought just in case anyone needed some pancake tips, I might help. Let's begin.

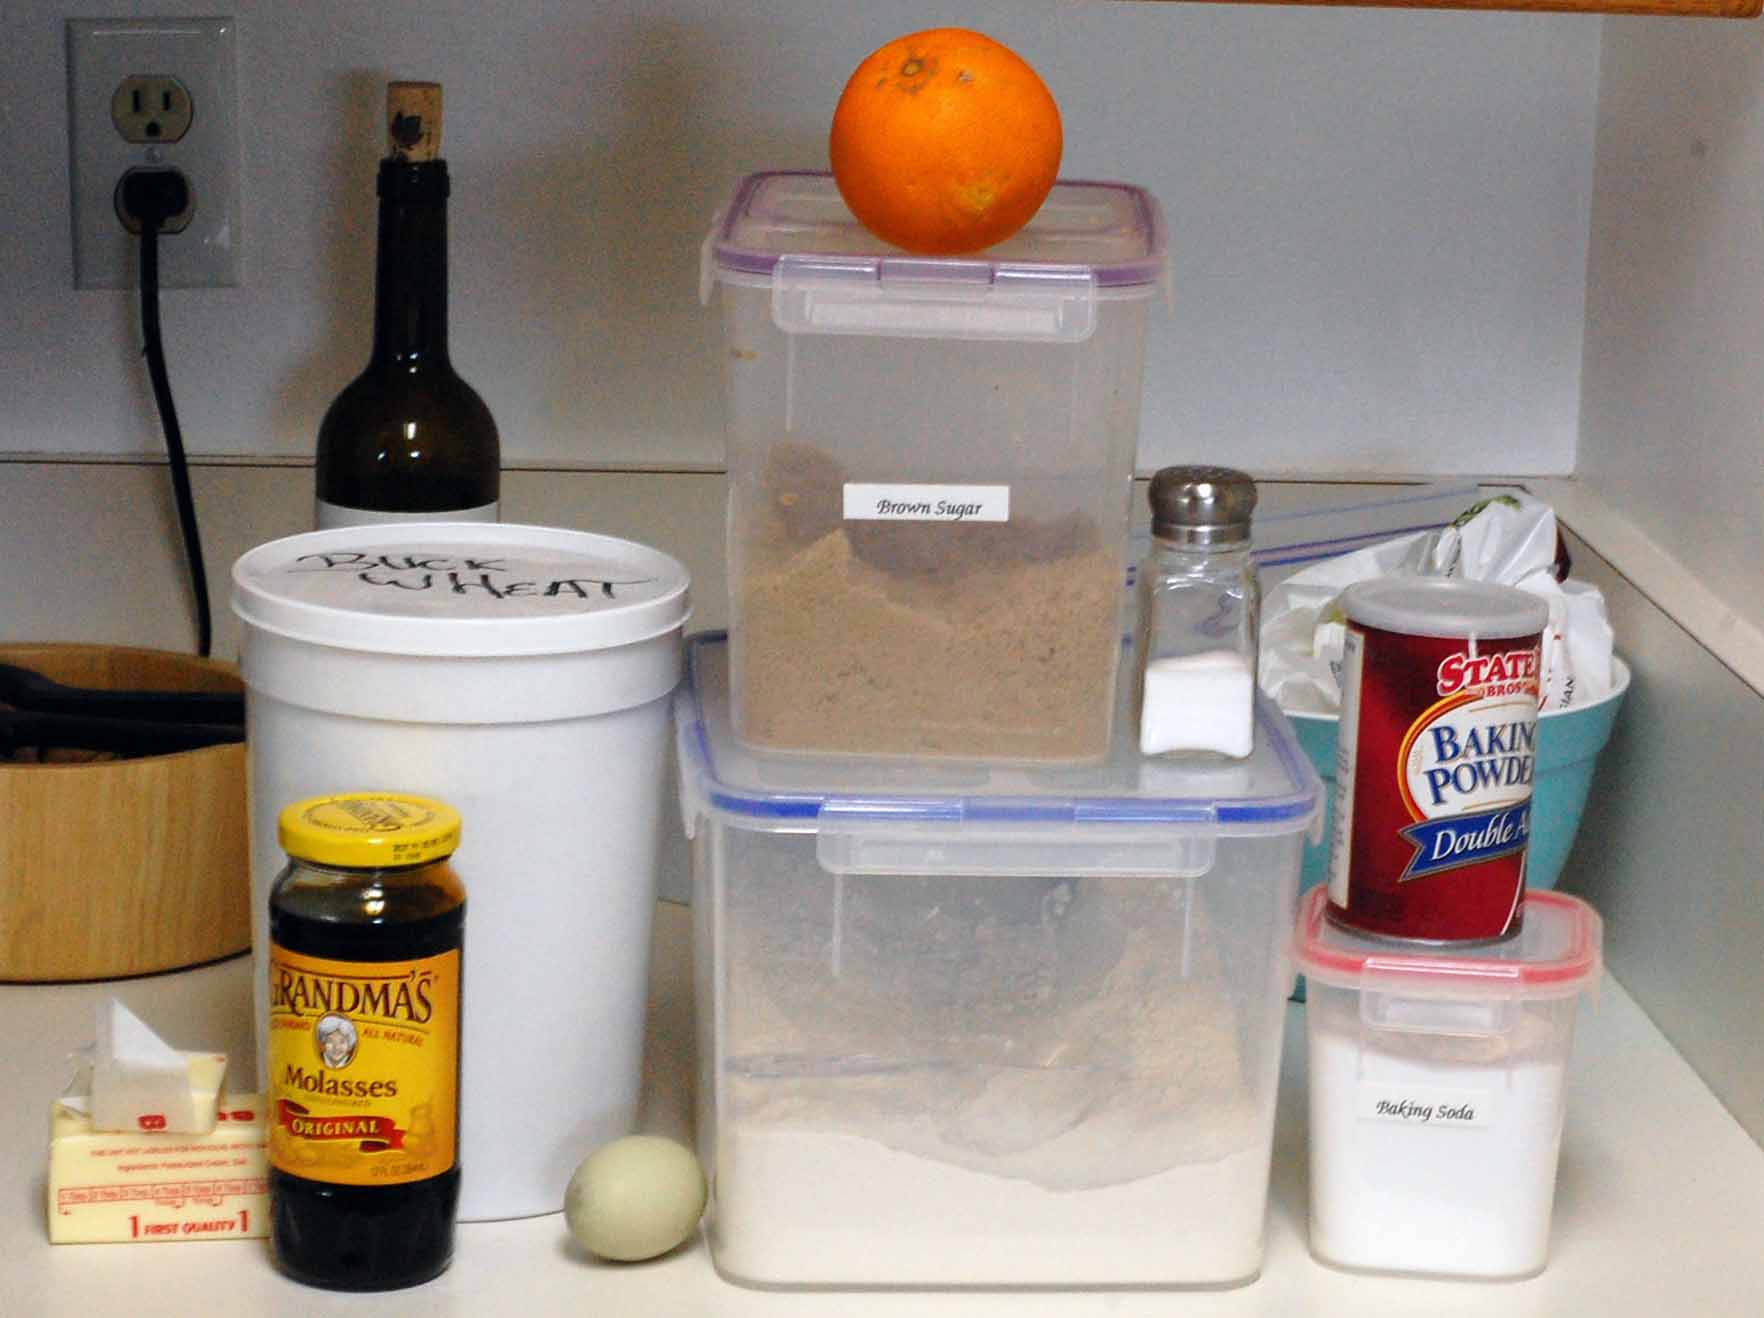
Here's what you'll need (this picture is minus the buttermilk, which is being created on the opposite counter.  Did you know that if you mix together one cup of milk with one tablespoon of vinegar and let it sit a few minutes you make buttermilk?  Fun fact.):


The green egg isn't required, but it is fun.  And never you mind what the wine is for.  That's neither here nor there.

In a medium bowl whisk the dry ingredients together, then set those aside.

Beat together the egg and molasses, then add in the melted butter and buttermilk.  Now add the wet to the dry and whisk together.

More after the jump...

 
SITE DESIGN BY DESIGNER BLOGS